Setting up Geth, Mist & TestRPC - Part 1 - Getting Started with Smart Contracts & Blockchain
Once you have acquired yourself with basic knowledge of Blockchain, it’s time to move on towards actually using it. We are going to use Ethereum for understanding how to create and use Smart contracts. Like any environment, Ethereum also comes with its own tools. Mist and Geth are the two most important tools that you must be comfortable with. Let’s check them out.
As we discussed in Part 0, a blockchain is nothing but a distributed ledger. This ledger is distributed over numerous nodes that are always in sync. To connect to the network we need a tool. One such official tool is Mist. Mist is a wallet. It allows you to not only store your ether cryptocurrency but also allows you to send and receive ether from other persons. There is another very important feature of Mist. Mist also allows you to create and execute Smart Contracts. Hence Mist is going to be an important tool for our journey into Smart Contracts.
There are 3 types of networks, Mist or any other Ethereum client can connect to.
- Main Network This is the network that is publically accessible to all and all real transactions happen here. It is the main blockchain where you need to be, to access ether and do real transactions.
- Test Network While developing a Smart Contract you can not test it on Main Network. That will be wastage of real resources. Therefore there are certain networks available whose sole purpose is to be used as test network. The money or transactions that happen here hold no real value as that’s only for testing.
- Private Network You can create your own private network or connect to an independent private blockchain. Usually, these networks are for testing only. Again the currencies held here or transactions that happen will not hold any real value.
When you start Mist, it will connect to Main Network by default. By starting Mist you will become part of Blockchain which means you also need to have a copy of the ledger. The first time you start Mist, it will synchronize itself. This could even take days as the data is already in many GBs now. Therefore it makes sense to start Mist in test network if your only purpose is to test it out. You can switch to test network in Mist’s menu. Although it will be fewer data to download it will still take some time to synchronize with test network.
Therefore I usually set up my own private network and use it for testing. This way you don’t need to download any data at all. For this Geth can be really helpful.
Geth is also a wallet like Mist but it has a command line interface. Unlike Mist, it comes with many features. You can use Geth to setup your own private blockchain network for Ethereum. It also has javascript console to manage it.
Both Mist and Geth can be downloaded from Ethereum’s Github repo. No need to download the source code and build it. You can directly download the binary files. https://github.com/ethereum/mist/releases https://geth.ethereum.org/downloads/
Once you have downloaded Geth and installed it. Run the following command on terminal
geth --dev --rpc --mine
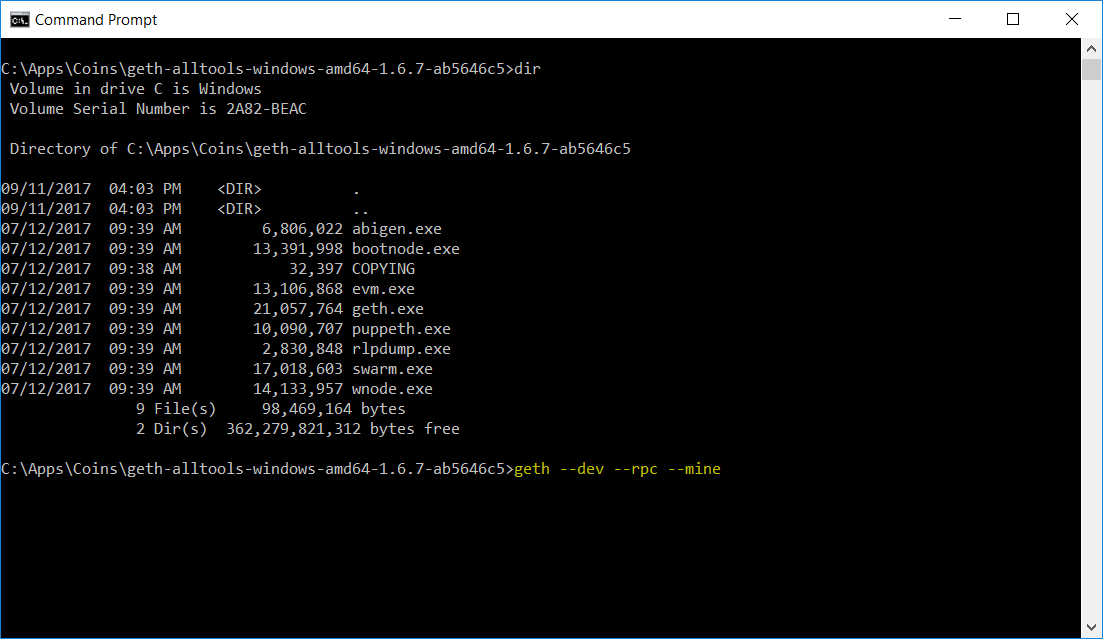 Geth is the executable file. You must have installed it and made sure that Geth is available in your environment’s path variable. Else you can go to the directory that has these files and execute from that directory on a terminal.
Here
Geth is the executable file. You must have installed it and made sure that Geth is available in your environment’s path variable. Else you can go to the directory that has these files and execute from that directory on a terminal.
Here --dev flag starts the geth in development mode creating a private network. Then --rpc flag starts it as RPC(Remote Procedural Call) server, making it easy to let Mist or another Ethereum wallet connect to our private network. --mine will start mining on the network. Since we are starting on local machine a new instance, our CPU will be fine to mine some Ethereum coins for us. We will need these coins to continue our workflow. Don’t get too excited by seeing too much Ether after mining, it’s of no use other than testing. If you receive any error saying ’etherbase address must be explicitly specified’, keep reading this article I will help you out with that error too.
One Geth starts, execute the Mist wallet. Make sure when you start, Mist is connecting to your server. There will a text saying Private Net on splash screen while starting Mist. In case there is any issue you can start Mist by calling its executable with --rpc http://localhost:8545 For e.g. on windows this should look like this
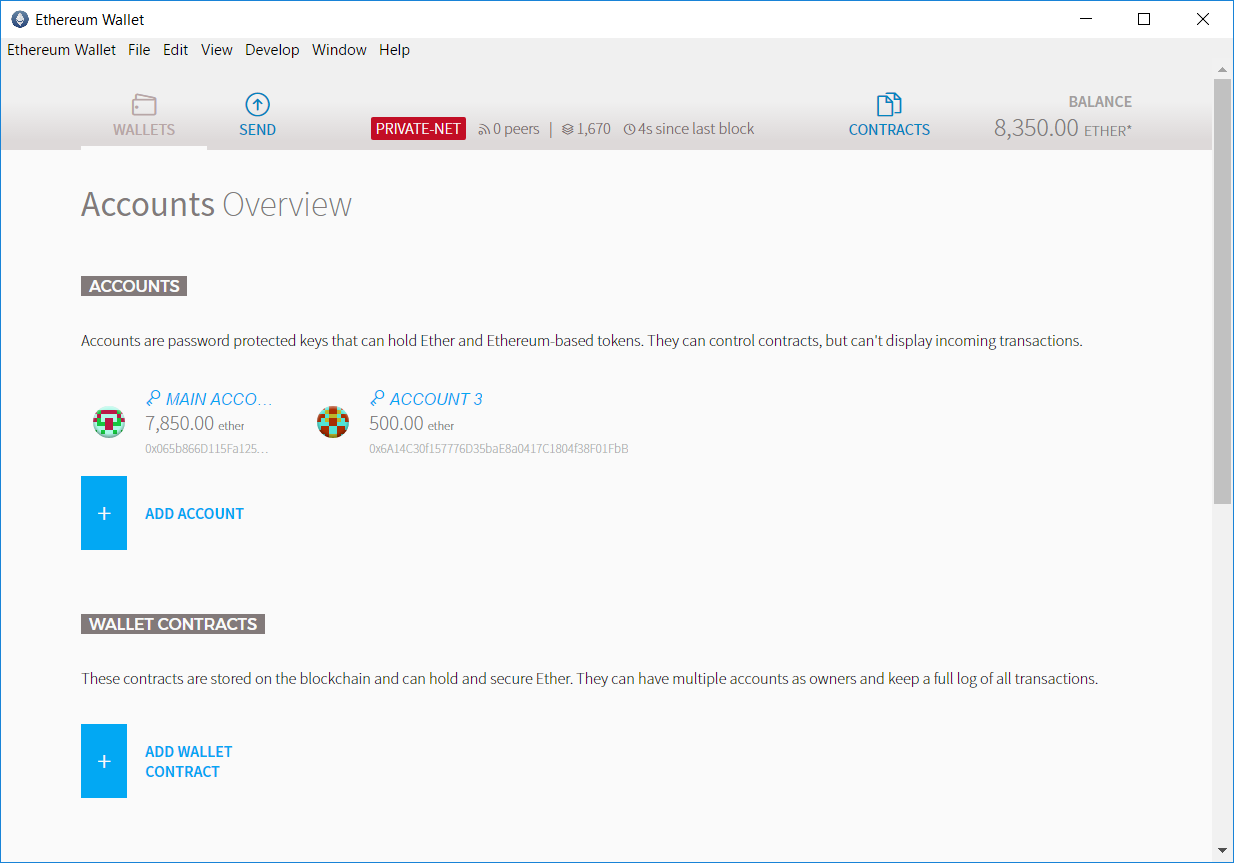
Now you have Geth and Mist running. Let’s try to create a new account and transfer some money to it. Inside Mist, click on the Add Account button. You will be asked for a password. Choose a password for this account. Once your account is created let’s try sending some Ether to it from Main Account. The reason Main Account has ether is that we started geth with --mine command which is mining Ether for us. Please remember this not real Ether as we are not on the Main network. Click on the send button on the top bar and enter the address of the newly created account. Enter the amount and send it. You have done your first transaction.
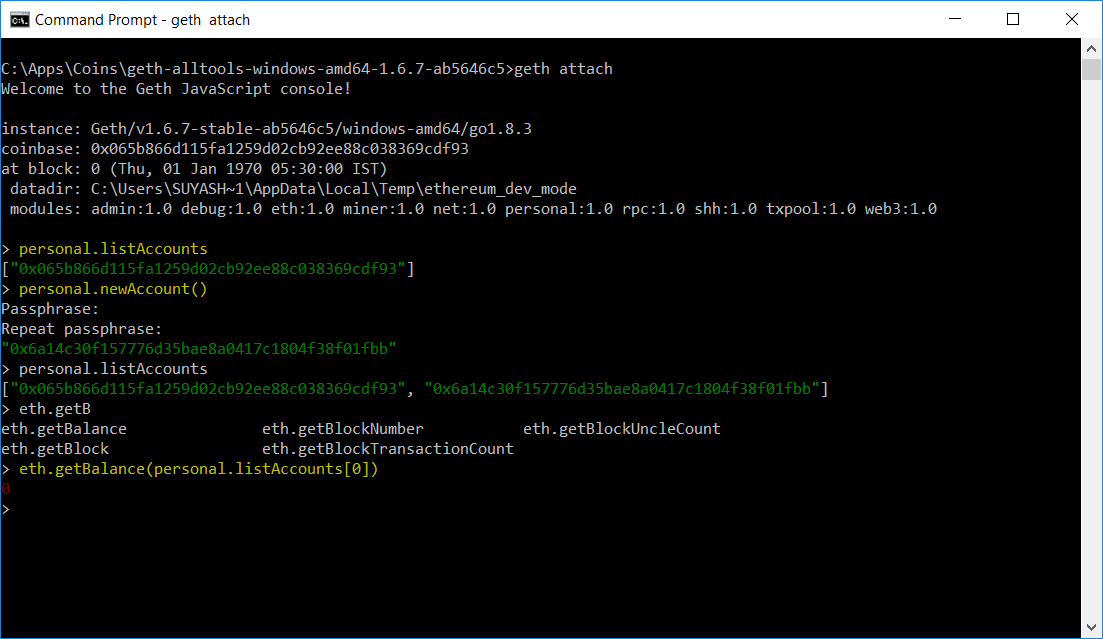
There is one very helpful feature for Geth and that is its console. You can start the console using the following command in new terminal
geth attach
If you receive any error saying ’etherbase address must be explicitly specified’, then it shows that we still don’t have a base account. In such case, start geth without mining i.e. geth --dev --rpc
You can attach console in a new terminal with geth attach command or attaching it while starting the server only i.e. geth --dev --rpc console
In console, use following to get list of all accounts
personal.listAccounts
You can create new accounts with
personal.newAccount()
To get balance, use
eth.getBalance(personal.listAccounts[0])
Here 0 is the first account from our list of accounts
To start mining use miner.start() command and miner.stop() to stop mining.
As you can see, we have to download and setup Geth. Then create a base account and add Ether by mining. Then we can create more accounts and send ether to them. All this can be done more easily by using testrpc. testrpc is an Ethereum node written specifically for the testing purpose. It creates a base account and other accounts for you and put some ether into it saving your time. To install testrpc you will need to have Node.js with npm installed. Once you have it install testrpc using
npm install -g ethereumjs-testrpc
this will install testrpc globally. If you are on Mac or Linux, you might need sudo rights. Once installed you can start it by simply running it in terminal
testrpc
Next Step
We have set up Geth, Mist, and TestRPC. TestRPC will be more useful when we get into the more programmatic approach. In next part, we will create our first Smart Contract. You can check it out here.